Free download Consult-III Plus software crack v75 for Nissan obd2 diagnostic tests, ECU programming/reprogramming and key making:
Nissan Consult III plus v75 software download:
CSP Software Version : CSP V41.10
Programming Data Version : Plus_V75
Password: Not required
Operating system:
Nissan Consult 3 Plus v75 Windows XP: confirmed! will have GOOD luck!
Nissan Consult3 Plus v75 Windows 7: confirmed!
Nissan Consult III Plus v75 Windows 8: confirmed!
Nissan Consult III-Plus v75 Windows 10: confirmed!
Nissan Consult 3 Plus v75 Windows Vista: you’re NOT ADVISED to use the sw on Vista!
Installation tip:
Uninstall the firewall, antivirus software.
Install the Consult 3 plus V75.20 to the C drive in the “NTFS” format.
Security: use with relief, 100% tested with Consult 3 plus china clone!
Languages: English/ French/ German/ Spanish/ Italian/ Japanese/ Portuguese/Russian/ Finnish/ Greek/ Chinese(Simplified)/ Chinese(Traditional)
Vehicles: Nissan and Infiniti from 1996 to 2017
Abilities:
Diagnostic: confirmed!
ECU programming: confirmed! ECU Programming without card
Key programming: confirmed! able to program new smart keys with a immo card
Tips: How to use Nissan Consult 3+?
Get started with Nissan Consult III Plus for diagnosis, immobilizer and reprogramming functions
What is Consult 3 plus:
The accurate and speedy diagnosis of a vehicle’s problem has become increasingly complicated as more sophisticated electronic hardware is fitted in vehicles, combined with a significant increase in the number of computers connected to the Controller Area Network (CAN). In the past five-year period, the number of computer systems fitted in today’s vehicles has doubled from only approximately eight in 2001. Nissan Consult 3 plus is specifically designed to address these complex and advanced in-vehicle electronic devices, enabling accurate diagnosis and repairs and shortening waiting times for customers
Swift diagnosis and swift repairs through automated operations
The selection of CAN type as well as the identification of malfunction locations are completely automated, allowing CAN diagnosis to be done 17 times faster than previous method where the diagnostics system needed to be supplemented by the service manuals. Repairs involving reprogramming of the in-vehicle computer can be completed 1.5 to 2.5 times faster with the new system.
Nissan Consult 3 plus Automated Self-diagnostics
The system is able to perform accurate diagnosis without having to rely on the diagnostic skills of technical staff at the dealership. Increased efficiency in operations based on wireless technology
With wireless vehicle communication interface, it is possible to check the condition of the vehicle from either (*2) inside or outside the vehicle. At dealerships in Japan, it is possible to access the Nissan network to retrieve both the maintenance technology data related to the diagnosis results and spot adequate information on service manual. The dealerships are also able to access their service database and refer to the vehicle’s maintenance history on the laptop PC.anydiag.com
Nissan Consult iii plus Capable of handling multiple complex defects
The diagnostics tool is equipped with various functions including simultaneous self-diagnosis of an entire system, simultaneous data monitor for multiple systems, data recorder, and oscilloscope capability.
Nissan Consult 3 plus Enhanced data management with improved laptop PC
New features such as adoption of color-screen and large-screen monitor allow viewing of large amounts of information altogether for enhanced data management
Nissan Consult 3 Map data update function for hard-disk navigation system
Through high-speed data update system, it is possible to update map data in approximately 20 minutes with the new CARWINGS navigation system (hard-disk) equipped in the all-new Skyline
Connection:
Once the C-III plus software has been installed, and the new VI hardware has been found, you can connect the Toughbook to a vehicle. Like the CONSULT-III, the C-III plus can connect via wireless bluetooth to the VI. Attach the DLC connector to the vehicle, turn the ignition to ON, and dangle the VI outside of the window of the car. Now double click the C-III plus desktop icon. The first new feature you will notice is that the C-III plus software load time has dropped to below ten seconds! Once fully loaded, the C-III VI is automatically selected and connected via bluetooth with no hassle. The C-III plus will also input the decoded VIN of a 2005 and newer Nissan vehicle, cutting yet another step from the diagnostic process. If the software doesn’t automatically connect to the VI for whatever reason, press “Sub Mode” at the bottom left, select “VI/MI Registration,” press on the connected VI to highlight it, then press “Settings.” Be sure it shows “Auto Connect: ON.”
Home screen:
This first screen is termed the “Home Screen,” and it will serve as the navigational foundation for all C-III plus features. Let’s walk through the different sections briefly. The horizontal bar at the top-most portion of the screen contains reference information. At a glance, you can see the VIN and the model of vehicle currently connected to the VI. It is also very easy to determine whether your software version number is up-to-date by making note of the six digit number at the top left, then pointing your browser at www.nissan-techinfo.com. Once on the Nissan site, choose “CONSULT Diagnostic Software Updates” from the drop-down menu below the log-in form. On the right of that page, you can view the most recent software versions. Always keep your C-III plus software at the newest stable release to ensure proper operation of the scan tool.
Image: The redesigned Home screen of the C-III plus interface.
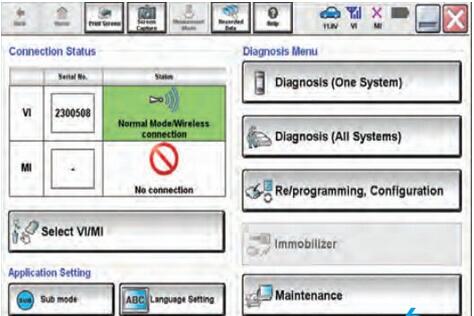
Below the reference information top bar on the Home screen are the horizontal navigation buttons called the browser bar. The C-III plus software is intuitively designed like a familiar web browser including icons and text labels. The “Back” button will move to the previously viewed screen. The “Home” button will return to the Home screen; however, doing so will clear all information about the current vehicle requiring reconnection. Use the “Home” button to start completely over with diagnosis or for a new vehicle. The following two buttons are incredibly useful: “Print Screen” and “Screen Capture.” The “Print Screen” button does what you’d expect: send whatever information you are currently looking at to an attached or wireless printer. The “Screen Capture” button will take a digital picture of the screen data, and save it to the Toughbook’s hard-drive for future use. Previously recorded information from the VDR mode, self-diagnostic results, and other saved data can be browsed and recalled by pressing the “Recorded Data” button.
The remaining icons on the browser bar comprise the status window. These pictures indicate vehicle battery voltage, the connectivity signal of the VI, and the status of the MI’s connection and its battery life. You can quickly determine if the C-III plus has detected either the VI or the MI. To switch between the interfaces, you can use the large button in the “Connection Status” section of the main active screen. The C-III plus can be quickly minimized or exited by the large buttons at the very top right.
Don’t be afraid to click the help icon on the browser bar. The redesigned C-III plus will display help about the current screen you’re viewing. Clicking help will not exit or otherwise interfere with your diagnosis. You will not have to spend extra time reading the entire help file when all you need is a little assistance with the current page. This updated help icon alone removes a great amount of time from new software’s learning curve. Just like any difficult repair, asking for a little bit of help can get you back on track rapidly
Diagnosis:
The Diagnosis Menu on the right portion of the active area holds easy-to-press icons and text bars for the majority of your scan tool jobs. Take special note: If the security card is installed in the Toughbook, all buttons except Immobilizer may be grayed out. This might cause some confusion. If necessary, exit the C-III plus application, physically remove the security card from the lower left access port of the Toughbook, then restart C-III plus to reconnect to the vehicle.
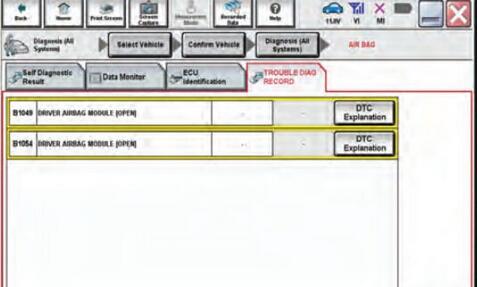
What a difference! The most commonly-used icons and procedures are available at a touch from the Diagnosis Menu on the Consult III plus’s main active screen. Primary functions like checking for DTCs can be done by pressing “Diagnosis” (All Systems). Another feature of the C-III plus is the dramatically reduced time necessary for a system call. Once all systems’ statuses have been queried, the C-III plus will have a color-coded display of Current, Pending/History, and no DTCs. On the left side, an ECU will be colored red if there is a current fault, yellow if there is a history code, or green if there is no fault detected. In the center of the active screen, a listing of the DTCs will be displayed in color coding, with a quick-press button to access Freeze Frame Data and a “plain English” explanation of the DTC.
You will also note a series of block buttons above the active screen with the visited page history. If you wish to go back a step, the browser bar’s Back button or this “breadcrumb” series of buttons will allow for very quick, intuitive navigation of the C-III plus. The tabs immediately above the active screen can be used to navigate to additional support functions of the C-III plus. For example, the Active Tests tab will bring up a series of possible bi-directional tests to aid in diagnosis. The Data Monitor tab allows you to configure the C-III plus to display all live data or just what you need for diagnosis. The Work Support tab will give you rapid access to nondiagnostic functionality like TPMS re-initialization, Idle Relearn Procedure, Steering Angle Learn Procedure, and more.
At any time, the list of DTCs can be saved to file, printed or erased by use of the buttons in the bottom right. The C-III plus also makes verifying a repair easier. From the home screen, the Diagnosis (One System) button will allow you to query status on the system you finished work on. The C-III plus will perform a quick system call and report if any DTC remains stored in that specific ECU. The One System active screen will behave as outlined above for the All System call.
Image: All DTCs are displayed clearly with relevant Freeze Frame Data and an in-depth explanation just one button press away.
Immobilizer and Reprogramming functions: easier than ever
The C-III plus shows its improvements over other scan tools when it comes time to perform the complicated procedures involved in re-flashing or replacing a computer module, and when programming immobilizer keys. Every technician knows that reprogramming a computer module can be time consuming due to the intricate, multi-step process that must be followed exactly to avoid damage. The C-III plus creates a “one stop shop” for module reprogramming by placing a Reprogramming button on the main Diagnosis Menu of the home page. Follow the printed directions on the TSB and procure the necessary re-flash file from www.nissantechinfo.com or www.infinititechinfo.com.
Once downloaded, the re-flash file will contain a README document that will instruct the user where to store the file. Once downloaded and properly located, the C-III plus will access the appropriate re-flash file and perform the update. In order to preserve information from the previous ECU, the C-III plus allows you to effortlessly export and import settings using the “Read/Write Configuration” button. The reprogramming submenus are clearly labeled with “Before Reprogram” and “After Reprogram” buttons to facilitate the transition.
Likewise, working with the immobilizer computer is as simple as installing the security key card and pressing the “Immobilizer” button on the Diagnosis Menu of the home screen. When registering new immobilizer keys, the C-III plus will automatically query the BCM for the necessary PIN code for decoding in the NATS database on the Nissan or Infiniti Techinfo websites. With the decoded passcode input, you’ve successfully performed immobilizer key registration in just a few button presses! Of course, the entire procedure is outlined in easytounderstand steps on the active screen making your job more about fixing cars than reading instruction manuals.
Once you’ve worked with the Consult-III plus, you’ll realize the power of Nissan’s next generation factory scan tool. The intuitive interface is an improvement over the original Consult-III based on focus group suggestions and most-requested features. The C-III plus eliminates many steps that were previously required for advanced diagnostic procedures such as immobilizer programming and ECU flashing. With reduced load times, systemcall times, and less time spent hunting for a functionality,the C-III plus makes it possible to harness the power of the best Nissan scan tool to date!
Image: ECU reprogramming and replacement has never been easier with the C-III plus’s completely redesigned interface.
Note that, Consult-III plus is confirmed to work for Nissan immobilizer and reprogramming functions also. Offline reflashing can be done, without requirement of an count and password.