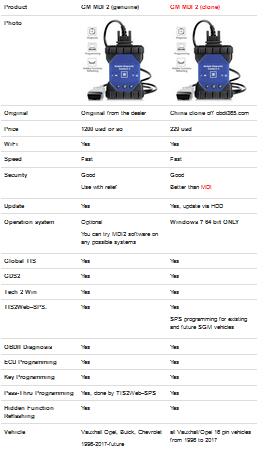
Look here: GM MDI 2 what’s the difference of the genuine and the china knock-off?
compared with GM MDI 1, what’s good of MDI2? Should you buy a new one?
Conclusion:
The MDI 2 genuine and china clone share the same functions.
They are different in the price and operating system only!
For a GM garage, you can buy the genuine to use with relief!
For personal use, the price of clone is good and it’s worth the money!
MDI 2 comes with GM software in a HDD that people don’t have to install software themselves and will have no installation issues!
Is it necessary to have a MDI 2 if you have a MDI already?
It depends.
If you are the one pursuit security and efficiency, it’s necessary to have a new MDI2 interface.
in detail… (all information below works for the original MDI2. for the china clone, it’s for reference only!)
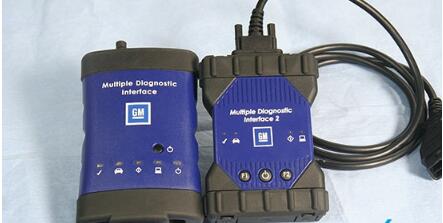
The next generation of the J2534 GM Multiple Diagnostic Interface, MDI 2 (Fig. 1, right), offers increased processing power and security than the original MDI (Fig. 1, left) for faster programming speeds on current Global A vehicles as well as future Global B vehicles. The compact communication module is required in order to manage the transfer of data between a vehicle’s onboard network and a service technician’s PC.
Fig. 1
Both original and clone MDI 2 are now available in the market.
Both MDI 2 supports diagnostic applications — GDS 2, Data Bus Diagnostic Tool, and Tech2Win — as well as Pass-Thru programming applications — TIS2Web–SPS.
Enhancements to the tool were based on technicians’ feedback on how they use the MDI and how to improve it. It replaces the first generation MDI, introduced in 2007, for Pass-Thru programming on current GM models. The MDI 2 is backward compatible, so it can be used to perform Pass-Thru programming on all vehicles built since 1996.
The MDI 2 connects to the vehicle via the J1962 connector using a new DLC cable. Connection between the MDI 2 and the PC running the Global Diagnostic System 2 (GDS 2) software can be accomplished via standalone (USB), through a new Point-to-Point wireless Wi-Fi interface feature (a simple plug & play), or through the dealership network (Ethernet or wireless).
MDI 2 Full Kit
The EL-52100 MDI 2 kit includes:
MDI 2 Unit
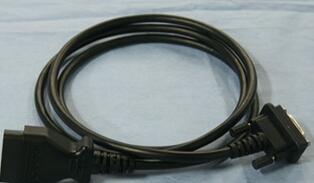
SAE J1962 DLC Cable (Fig. 2)
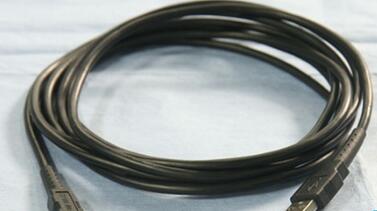
10-ft. USB A to USB B Cable (Fig. 3)
Ethernet Cable
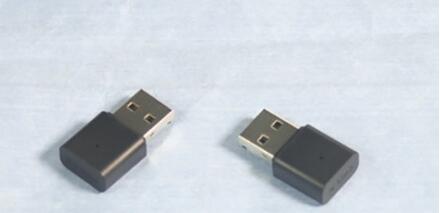
D-Link Wireless USB Adapters (Dongles) (Optional; for wireless connection) (Fig. 4)
Fig. 2
Fig. 3
Fig. 4
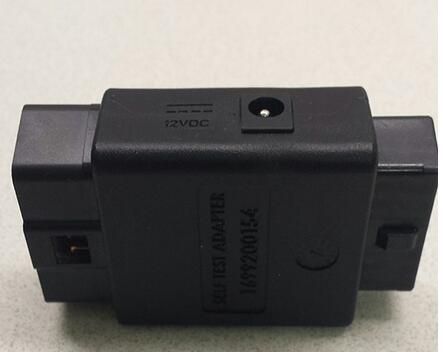
A DLC Cable Self-Test Loopback Adapter (Fig. 5) was sent to dealerships as an essential tool in December. It’s compatible with the MDI and MDI 2. It’s also sold separately through GM Dealer Equipment.
The adapter is used to test the DLC cable for open wires when used with the MDI Manager software. The adapter also can be used to power the MDI or MDI 2 on the workbench.
Fig. 5
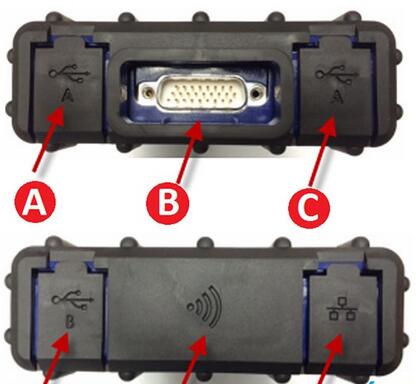
GM MDI 2 Connections (Fig. 6)
USB Port Type A
DB26 Connector (DLC Cable)
USB Port Type A
USB Port Type B – PC Connection Port
Wireless Adapter (Dongle)
Ethernet Port
New Features
Wi-Fi Connection– The USB Wi-Fi adapter uses a USB dongle that enables Point-to-Point connections without the need for Wi-Fi SSID information or a wireless router.
USB Connection– Uses a new, more secure Type B connector and Ground Offset Failure protection. A wired connection is recommended for longer programming events.
Power Source – The MDI 2 is powered from the vehicle battery via the DLC Cable. It may also be powered over USB to perform firmware updates only using a PC.
Power Backup– Internal batteries that were used in case of a power interruption have been removed, which eliminates the possibility of old batteries corroding over time and damaging the unit. Capacitors maintain power during engine cranking, so operation is maintained.
Firmware Download– Uses USB 2.0 for faster firmware downloads instead of a separate AC power supply.
Future Expansion– Additional USB ports, an SD memory card slot and Function buttons are built into the unit for future enhancements.
Operating Temperature Range– The temperature range has been extended to -20° to 70°C (the MDI range was zero to 50° C).
DLC Cable– The DLC cable is twice as long as the previous cable and connects at the top, making it easier to use. The cable only connects to the MDI 2. A self-test adapter (accessed through the MDI Manager) can be used to test the integrity of the cable.
MDI Manager Software
The MDI Manager must be installed on the PC in order to configure, update and run diagnostic applications targeted for the PC. Initially, use the MDI Manager software to set up the configuration of the MDI 2. The MDI Manager is also used to update the firmware on the MDI 2. Visit the TIS2Web/GlobalTIS website to determine if a newer version of MDI Manager software is available.
Wireless Dongle Setup
The first time the MDI 2 is used, the point-to-point USB dongle must be paired with the PC, which will install the necessary drivers on the computer. One dongle should be plugged into the PC and one into the MDI 2. (Fig. 7) The dongles are identical. Use either one for either connection. Remove the bottom dust cover to access the port.
TIP: Do not plug the dongle into a USB hub. It must be plugged directly into the computer.
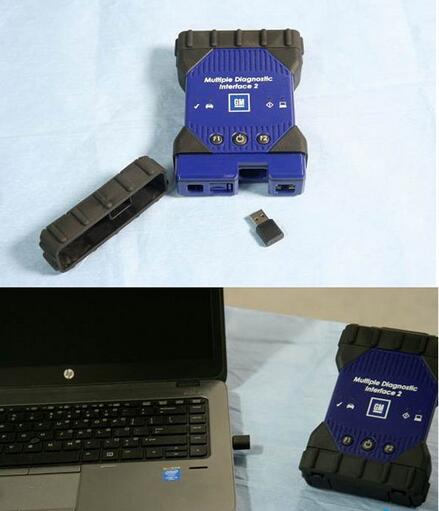
Fig. 7
Connect the MDI 2 to the PC via the USB cable. After starting the MDI Manager, the Point-to-Point connection is automatically configured. The USB dongles are intended to stay plugged into the PC or laptop at all time. If it must be removed, safety eject it by right-clicking on the Windows USB icon in the bottom right toolbar on the computer.
Dealerships considering new purchases should look into the MDI 2 for its many new advantages The original MDI will continue to be supported, but will not work on future Global B models.
– Thanks to Chris Henley
